


Blog
How to Polish Sheesham Wood Furniture at Home Naturally: Easy DIY Guide (2026)


If you own a sheesham wood bed, dining table, or wardrobe, you’ve probably noticed something, after a year or two, that rich, golden-brown shine starts looking a little… tired. Dust settles into the grain, the surface feels drier than it used to, and under bright light you can see it’s lost some of its glow.
Good news: you don’t need an expensive furniture polish spray or a professional visit to fix this. Sheesham wood responds really well to a handful of natural ingredients you probably already have in your kitchen. This guide walks you through exactly how to polish sheesham wood furniture at home, using methods that are actually safe for solid wood, not just something that sounded good on the internet.
Why Sheesham Wood Needs Regular Polishing
Sheesham (also called Indian rosewood) is dense, durable, and naturally resistant to wear, that’s exactly why it’s used for furniture that has to survive daily life in Indian homes: beds, dining tables, TV units, wardrobes. But “durable” doesn’t mean “maintenance-free.”
Over time, three things dull the finish:
- Dust and grime build up in the grain and make the surface look flat
- Dry air (especially in winter, or in rooms with AC running constantly) pulls moisture out of the wood, leaving it looking parched
- Daily wear, hands, elbows, cups, bags, slowly wears down the top layer of polish
None of this means your furniture is damaged. It just means it’s due for some care. Polishing every 2-3 months (more often for pieces that get heavy use, like a dining table) keeps sheesham looking the way it did on day one, and actually extends the life of the wood, because a well-conditioned surface resists scratches and moisture better than a dry one.

What You’ll Need
Skip the hardware store. Here’s what actually works, and you likely have most of it at home already:
- Coconut oil or olive oil
- White vinegar
- A few drops of lemon juice (optional, for shine and smell)
- Beeswax or a natural furniture wax (for deeper conditioning, once every few months)
- Two soft, clean cotton cloths — one for cleaning, one for buffing
- A soft-bristled brush (an old toothbrush works fine) for carved details or corners
That’s genuinely it. No chemical polish, no silicone spray, no random online furniture cream.
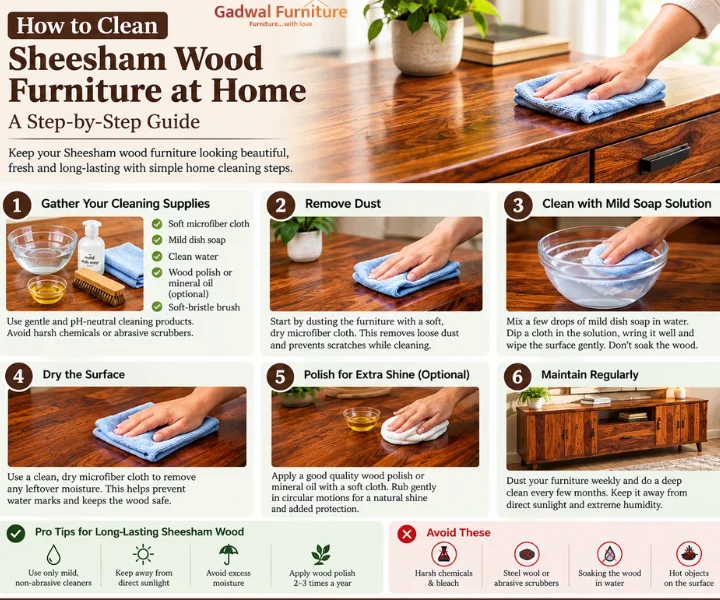
Step 1: Clean the Surface First
This is the step most people skip, and it’s the reason a lot of “polishing” attempts leave streaks or a sticky film.
- Dust the entire piece with a dry microfiber cloth, working with the grain, not against it
- Mix a small amount of mild soap in lukewarm water, just enough to make it slightly soapy, not sudsy
- Wipe down the surface with a barely damp cloth (wood and standing water are not friends)
- Dry immediately with a separate clean, dry cloth
Never skip the drying step. Sheesham is solid wood, and leaving moisture sitting on it, even for ten minutes, can leave a water mark that’s annoying to fix.
Step 2: The Natural Polish Mix
Once the surface is clean and dry, mix:
- 2 parts coconut oil (or olive oil)
- 1 part white vinegar
- A few drops of lemon juice if you want a fresher scent
Why this combo works: the oil nourishes the wood and brings back the shine, the vinegar cuts through any leftover grime and helps the oil absorb evenly instead of sitting on top as a greasy layer, and the lemon juice is just there for smell and a very slight extra shine, it’s optional.
How to apply it:
- Dip a soft cotton cloth into the mixture, don’t soak it, just lightly dampen it
- Apply in small, circular motions, working with the wood grain
- Let it sit for 5-10 minutes so the wood actually absorbs the oil
- Buff with a dry cloth until the surface feels smooth, not oily
You’ll notice the color deepen almost immediately, that’s the natural grain of the sheesham coming back through, not a coating sitting on top of it.
Step 3: Deep Condition With Beeswax (Every Few Months)
For pieces that take a beating, dining tables, bed frames, wardrobe doors, a light coat of natural beeswax every 3-4 months adds a protective layer on top of the oil treatment. Rub a small amount in with a soft cloth, let it sit for a few minutes, then buff it out with a dry cloth until it’s smooth to the touch. This step isn’t necessary every time you clean, but it makes a real difference in how long the shine lasts between polishes.
What to Avoid
A few things people do with good intentions that actually damage sheesham wood over time:
- Commercial silicone-based sprays, they give an instant shine but build up a film over time that dulls the wood underneath and is a pain to remove later
- Too much water, sheesham can swell or warp with repeated moisture exposure, which is exactly why monsoon season is when most wood damage complaints happen
- Harsh chemical cleaners, anything with ammonia or bleach strips the natural oils out of the wood
- Direct sunlight for drying, if you’ve just cleaned the furniture, let it air dry in shade, not next to a window; direct sun can cause uneven fading
How Often Should You Do This?
- Dusting: every 2-3 days with a dry cloth
- Light natural polish (oil + vinegar mix): every 2-3 months
- Deep conditioning with beeswax: every 4-6 months, or before/after monsoon season
- High-use pieces (dining tables, study desks): polish slightly more often than bedroom furniture, since they see more daily contact
If you’re in a humid coastal city or somewhere with a heavy monsoon, lean toward the more frequent end of that schedule, moisture in the air affects wood faster than most people expect.
Also Read: How to Protect Wooden Furniture During Monsoon in India
A Quick Word on Warranty and Long-Term Care
If your furniture came with a lifetime warranty (a lot of solid sheesham pieces do), regular care like this is actually what makes that warranty meaningful. Solid wood that’s dusted, occasionally oiled, and kept away from constant direct moisture will genuinely last generations — that’s the whole point of buying solid wood over engineered alternatives in the first place. A little care every couple of months is a small trade-off for furniture that’s still going strong twenty years from now.


Frequently Asked Questions
How to polish wooden furniture naturally at home?
Mix two parts coconut or olive oil with one part white vinegar, apply it with a soft cloth in circular motions along the grain, let it sit for 5-10 minutes, then buff with a dry cloth. That’s the whole method, no commercial products needed. A few drops of lemon juice in the mix adds a bit of extra shine if you want it.
Can I use coconut oil to polish wood?
Yes, and it’s one of the best natural options for sheesham specifically. Coconut oil penetrates dense hardwoods slowly and evenly, nourishing the grain rather than just sitting on the surface the way silicone sprays do. Just don’t overdo it, a light coat buffed out well works better than a heavy, greasy application.
How to make wood shine naturally?
The shine comes from two things working together: cleaning off the dust and grime that’s dulling the surface, then feeding the wood with a natural oil so the grain looks rich again. Skipping the cleaning step and jumping straight to oil is the most common reason people don’t get the shine they’re expecting.
Can sheesham wood be washed?
Not with running water or a soaking-wet cloth, sheesham is solid wood, and too much moisture can make it swell or warp over time. A barely damp cloth with a little mild soap is fine for cleaning, but it needs to be dried immediately with a separate dry cloth. Think “wipe,” not “wash.”
How often should sheesham furniture be polished?
Dust every 2-3 days, do a light natural oil polish every 2-3 months, and deep-condition with beeswax every 4-6 months. High-use pieces like dining tables need it slightly more often than a bedroom dresser that barely gets touched.
For more info, contact: support@gadwalfurniture.com
Follow our Instagram : Gadwal Furniture










2 thoughts on “How to Polish Sheesham Wood Furniture at Home Naturally: Easy DIY Guide (2026)”