Blog
How to Remove Scratches from Sheesham Wooden Furniture and Keep It Looking New

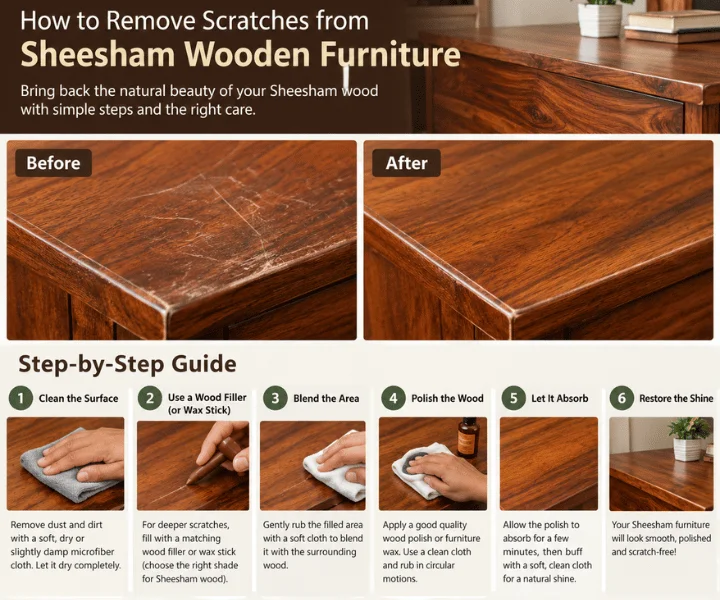
Picture this. You finally bring home that gorgeous Sheesham dining table. It gleams under the lights, and you smile every time you walk past it. Then, one evening, someone drags a steel plate across it, and you hear that little scratching sound. Your heart sinks.
We have all been there. But here is the good news: most scratches on Sheesham furniture are far easier to fix than they look.
This guide shows you exactly how to remove scratches from Sheesham wooden furniture at home, step by step, in plain language. You will also learn which remedies to skip, how to protect your pieces in daily life, and when it is smarter to call a professional. At Gadwal Furniture, we work with solid Sheesham every day, so these are tips we genuinely trust.
Why Sheesham Is Forgiving When It Gets Scratched
Sheesham, also known as Indian Rosewood, is dense, heavy, and rich in natural oils. That combination works in your favour.
- Density: Because the wood is hard, many scratches stay shallow and only touch the finish.
- Natural oils: These help polish and wax sink in and blend smoothly.
- Solid construction: Real solid Sheesham wood furniture is solid all the way through, so careful sanding and refinishing is safe. Thin veneers do not give you that freedom.
So take a breath. Your furniture is tougher than you think.
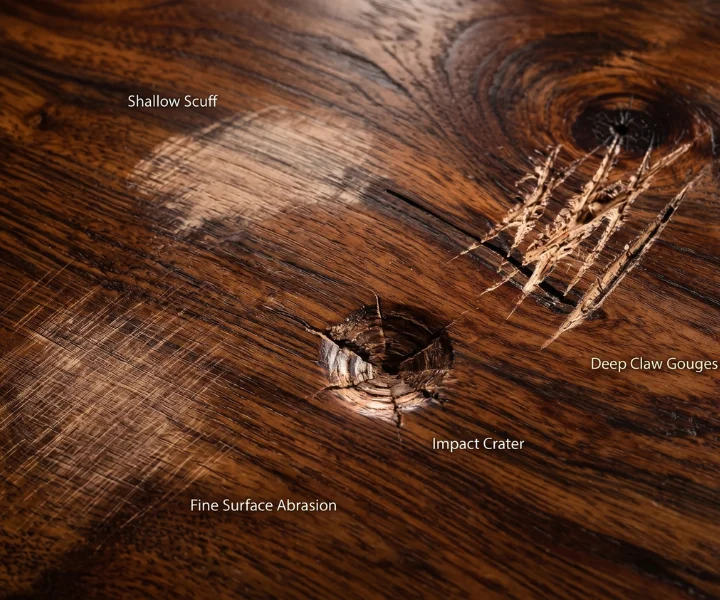
Step 1: Check How Deep the Scratch Really Is
Before you reach for any product, do a quick check. It takes less than a minute and saves you from over-fixing a tiny mark.
Run your fingernail lightly across the scratch.
- Nail glides over it: Surface scratch. Only the top finish is touched.
- Nail catches a little: Medium scratch. The finish is broken, and you may see lighter wood.
- Nail sinks in: Deep scratch or gouge. The wood fibres are damaged.
Also look at it from a side angle in good light. White, hazy lines are usually on the finish. Dark or raw-looking lines go deeper.
Step 2: Know What Finish Your Furniture Has
This step gets skipped a lot, and it is the reason many DIY repairs look patchy.
Most Sheesham furniture has one of two finishes:
- Lacquer, PU, or polish finish. A thin, protective layer sits on top of the wood.
- Oil or wax finish. The finish soaks into the wood and gives a soft, matte look.
Here is a simple test. Put a tiny drop of water on a hidden spot. If it beads up, the finish is sealed (lacquer or PU). If the wood slowly darkens, it is likely oil or wax.
Whatever you decide to use, test it on a hidden spot first, like the back of a leg or inside a drawer. Wait a few hours before you try it on a visible area.
What You May Need
You will not need all of this for every scratch. Pick what suits the damage.
- Soft cotton cloths
- Mild soap and water
- A walnut or almond
- Coconut oil or furniture oil
- Beeswax or furniture wax
- Wax filler stick or touch-up marker in a Sheesham brown shade
- 320 to 400 grit sandpaper
- Extra-fine 0000 steel wool
- Wood filler
- Polish that matches your finish
How to Remove Light Scratches
Always start with the gentlest method. Many marks disappear without any real repair.
1. Clean the Area
Sometimes a “scratch” is just dust, dried polish, or a wiping mark. Dampen a soft cloth with water and a drop of mild soap, wipe gently, and dry immediately. Never soak the wood.
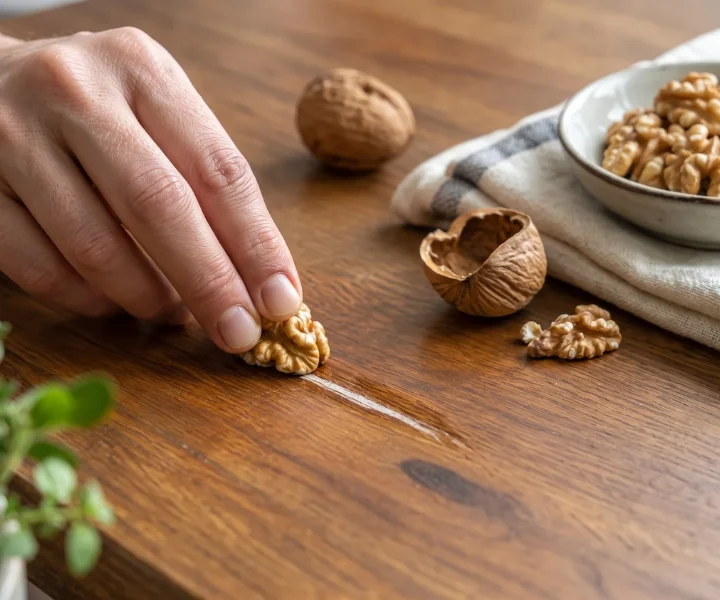
2. Try the Walnut Rub
It sounds old-fashioned, but it works. Take a shelled walnut and rub the broken edge along the scratch, following the grain. The natural oils darken the exposed wood and make the line fade. Leave it for a few minutes and buff with a clean cloth. Almonds and Brazil nuts work the same way.
3. Use a Little Coconut Oil
Add a few drops of coconut oil to a cloth and rub it along the scratch with the grain. Wait 10 to 15 minutes, then wipe off the excess.
Keep it light. Too much oil leaves a sticky surface that collects dust, and it may not absorb on a glossy lacquer finish.
4. Apply Beeswax
Warm a small bit of wax between your fingers, rub it into the scratch, let it settle for a few minutes, and buff. This is lovely for oil-finished tables, chairs, and side tables.
5. Gentle Steel Wool (With Care)
For a stubborn surface mark, use 0000 steel wool with a touch of wax or oil. Use almost no pressure and move only along the grain. Going across the grain creates new scratches.
How to Fix Medium Scratches
If your nail catches, the finish has broken, so you need a little more help than oil.
Touch-Up Marker or Wax Filler Stick
This is the easiest fix for most homes.
- Clean and dry the area.
- Choose a shade close to the wood around the scratch. If unsure, go slightly lighter. You can always darken it.
- Colour the scratch or press the wax stick into it.
- Wipe off the extra straight away.
- Buff gently and finish with a thin layer of polish or wax.
Sheesham has natural colour variation, with darker and lighter streaks. Match the shade right next to the scratch, not the entire piece.
Light Sanding and Refinishing
On a lacquered surface, wrap 320 or 400 grit sandpaper around a small block. Sand very lightly along the grain, only until the scratch fades. Wipe the dust away, then apply a thin coat of matching polish or oil. Because Sheesham is hard, it sands slowly, which gives you good control.
How to Repair Deep Scratches
Deep marks take more time, but they are still a manageable weekend project.
- Clean the groove. Remove dust and loose fibres.
- Fill it. Press wood filler into the scratch with a small scraper or an old card. Slightly overfill, because filler shrinks as it dries.
- Let it dry. Follow the instructions on the product. This usually takes a few hours.
- Sand it level. Start with 240 grit, then move to 320, always along the grain.
- Colour match. Use a marker or stain to blend the patch.
- Seal it. Finish with a thin coat of polish, lacquer, or oil that matches the rest.
If the damage covers a large tabletop or a very visible panel, a professional re-polish will give a more even result.
A quick note on dents: If the wood is pressed in rather than cut, place a damp cloth over the spot and press a warm iron on top for a few seconds. The steam helps the fibres swell back up. Check often, since too much heat can harm the finish.
Home Remedies: Honest Opinions
The internet loves “miracle” fixes. Here is what we think.
Usually fine for light scratches: walnut rub, small amounts of coconut oil, beeswax.
Use with caution: vinegar and oil mixes, and lemon juice. Both are acidic and can dull some finishes. Test first, and avoid them on glossy lacquer.
Please avoid: toothpaste (it is mildly abrasive), harsh cleaners, bleach, silicone sprays, rough scrubbing pads, and soaking the wood in water.
Mistakes That Make Scratches Worse
- Rubbing or sanding across the grain
- Using too much oil, wax, or polish
- Skipping the hidden-spot test
- Using the furniture before the repair has dried
- Sanding more than needed
- Using oil on a lacquered surface or lacquer on an oiled one
Slow and gentle always wins.
How to Protect Sheesham Furniture from Future Scratches
Prevention is easier than repair. A few habits can keep your pieces looking fresh for years.
On surfaces
- Use coasters under glasses and cups.
- Put mats or runners on dining tables.
- Stick felt pads under lamps, planters, and décor items.
On legs and edges
- Add felt or rubber pads under chair and table legs.
- Lift furniture instead of dragging it.
With kids and pets
- Use a play mat under areas where children draw or play.
- Trim pet nails regularly.
- Teach little ones early that furniture is not for scratching or standing on.
In daily cleaning
- Dust weekly with a soft, dry cloth. Dust can act like fine sandpaper.
- Wipe spills at once.
- Polish or wax every three to six months to keep the finish protected.
In your room
- Keep furniture away from strong direct sunlight, which fades colour.
- Avoid placing it right next to heaters or AC vents.
Care Tips for Each Furniture Piece
Palang (bed): Headboards and side rails often get bumped. Wipe with a dry cloth and avoid dragging the bed. Planning a new one? Our guide to palang designs for every room can help you choose.
Dining table: Highest wear, so mats are a must. Clean with a barely damp cloth and dry straight away.
Wardrobes and cabinets: Door edges and handles take the knocks. Soft bumpers help.
Chairs: Check leg pads often, and tighten loose joints. A wobbly chair scratches itself and the floor.
Coffee and side tables: Use a tray or runner for remotes, cups, and books.
When to Call a Professional
DIY works for most cases, but get expert help when:
- The scratch covers a large part of the surface
- The finish is peeling, bubbling, or turning white in patches
- The damage affects a joint or structural part
- The piece is an antique or very valuable
- Your repair did not match in colour
A good polisher can refinish the whole surface for an even look, which is sometimes better than patching many small spots.
Quick Scratch Fix Cheat Sheet
| Scratch Type | How It Feels | Best Fix |
|---|---|---|
| Surface | Nail glides over | Clean, walnut rub, oil, or wax |
| Medium | Nail catches slightly | Touch-up marker, wax filler, light sanding |
| Deep | Nail sinks in | Filler, sanding, colour match, sealing |
| Dent | Pressed in, not cut | Damp cloth and warm iron, then polish |
Frequently Asked Questions
Can I remove scratches from Sheesham wooden furniture without sanding?
Yes. Light and medium scratches often respond well to walnut, oil, wax, or touch-up markers. Sanding is only needed for deeper marks.
What is the best home remedy for scratches on Sheesham wood?
A walnut rub works nicely on light scratches. Coconut oil and beeswax also help. Test on a hidden spot first.
Does coconut oil damage wooden furniture?
A little usually does not, but too much can leave a sticky film. Use a thin layer and wipe off the extra.
How do I match the colour of Sheesham when repairing?
Look at the wood right around the scratch, not the whole piece. Pick a marker or filler one shade lighter, then deepen it slowly.
How often should I polish Sheesham furniture?
Roughly every three to six months, depending on how much the piece is used.
Can deep scratches be hidden completely?
Most of the time, yes, with filler, sanding, colour matching, and a final coat. For highly visible areas, a professional refinish gives the best finish.
Final Thoughts
A scratch is not the end of your furniture’s beauty. With a soft cloth, a little patience, and the right method, most marks fade or disappear. Start gentle, match the fix to the depth, and always follow the grain.
Then protect your pieces with coasters, felt pads, and regular dusting, and they will reward you for many years.
Looking for sturdy, beautiful furniture that ages gracefully and repairs easily? Explore our range of solid Sheesham wood furniture at Gadwal Furniture. Made to last, and made to be lived in.
For more info, contact: support@gadwalfurniture.com
Follow our Instagram : Gadwal Furniture